Sunday 19 February 2017

Sketchy lady colour wheel

Hello there.  Just realised I never got round to blogging this sample from January's Claritystamp show.  It was so nice to revisit some old stamps and create something new. 

I decided to use sketchy lady's outfit to create a colour wheel.  So first, I had a quick play on copy paper to make sure the idea would work, and to choose the colours.  I used distress inks:  candied apple, spiced marmalade, mustard seed, lucky clover, mermaid lagoon and wilted violet. 


Then I had a further practice run perfecting the positioning.  So now we're ready to go for it.  Be aware that this is a substantial piece of artwork, so you'll need to start with a piece of card approx 12" square.

I started first by making a deluxe, exclusive piece of equipment as taught by my dear friend Maria Simms at her Shrewsbury workshops. 

Punch a circle from some copy paper, and fold and mark into the required number of equal sections:  I went for 12 here.  Use a piece of blu-tac to hold it in place in the middle of the card.


I started by stamping 12, 3, 6 and 9 o'clock into place.  You can see how I lined up her toe with the marks.


Now its just a matter of working around the circle, lining up sketchy lady's toe with the marks each time.


Lift off your deluxe, exclusive piece of equipment, and there you have a perfect circle at the centre of your wheel.


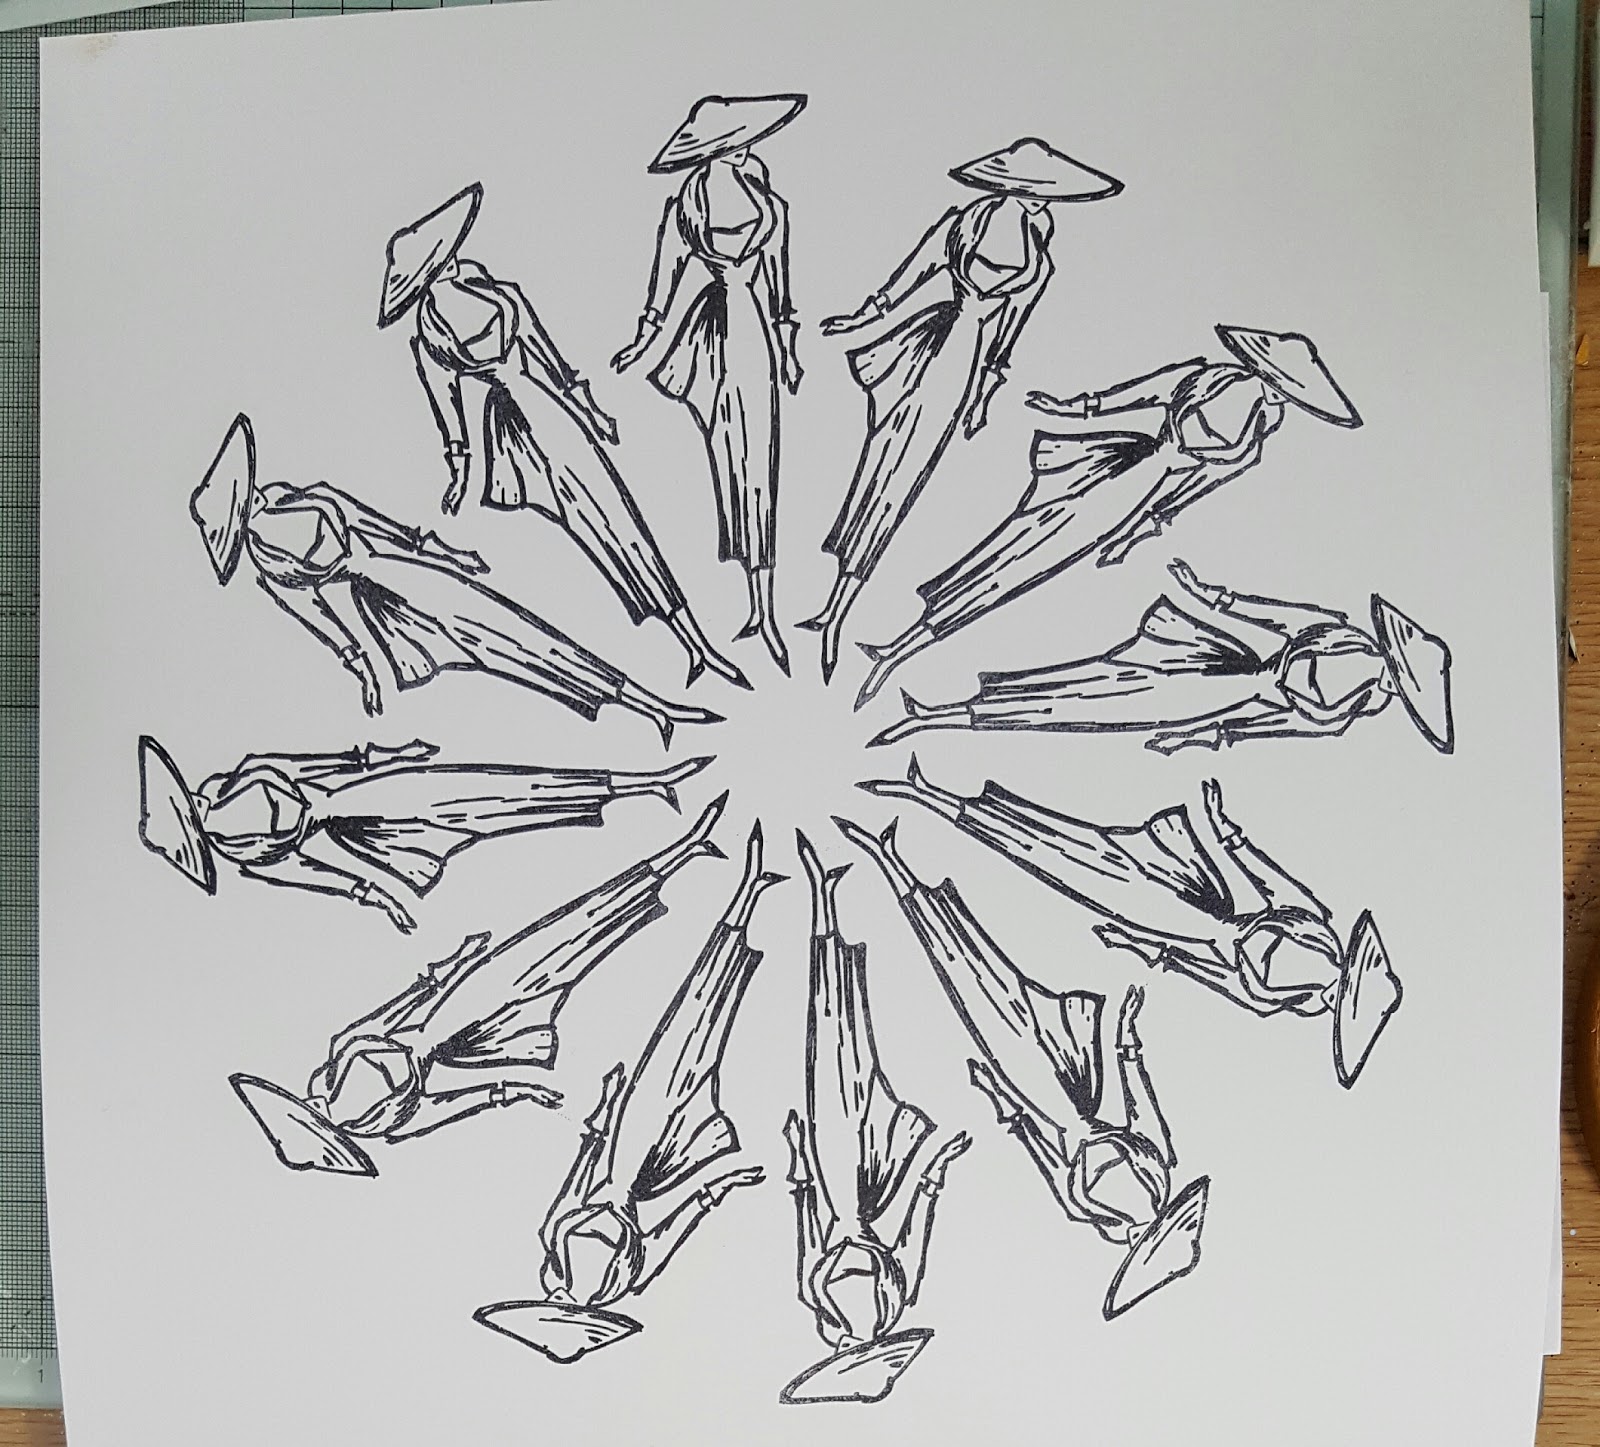
I worked my way round from 12 o'clock, masking off the outie of each sketchy lady in turn, while I coloured her outfit.  I really love the rainbow effect and some of the colour blends I achieved.  To finish, I used my polychromos to add a little colour to the face and feet, and edged with a black sharpie pen.


I hope you like it as much as I enjoyed making it.  I'll be back soon.  Till next time.  Xxx

Monday 13 February 2017

Ballroom dancing

Hello there.  Blogging again, I hear you say?  I'm definitely on a roll at the moment!  Aren't these new dancer stencils fab?  This one in particular really evokes all the glamour of the ballroom, something I tried to capture in my samples.

For this first one I used picked raspberry, wilted violet and blueprint sketch distress inks and built up the background colour gradually with my Clarity stencil brushes.  It does take quite a bit of time to build up this intensity of colour.  I went round the edge with black distress ink and a blending tool.  I think I might have added a bit of chipped sapphire as well to add even more drama.

Then I started work on the large "glitterball" moon.  I cut out a large circle of double sided adhesive sheet and stuck it into place.  Then, working across a row at a time, stuck the squares of kitchen foil into place.  Buff up when finished, and brush on a little talc to de-tack any exposed adhesive.

All that was left to do was to put the dancers in place.  I always feel a bit nervous when I've done so much work on a project and am about to tackle the final make or break stage.  This time, I got a beautiful crisp image with the black embossing paste and sprinkled on some black distress glitter for a really luxurious effect.


The piece below was done using one of the new Claritystamp designer papers.  I used the softer, more muted side of this particular design as my background.  

I made a paper mask of the stencil design to allow me to overlap the dancing couples.  It took me quite a while to decide on the colour to use for each of the couples as I wanted each one to be different, but still co-ordinate with each other; and tone in with the background too.  I sponged purple ink through the couple at the front;  this would add a barely noticeable shadow once I paper pieced the design, and also provide the much needed guide for accurate placement of each of the pieces.  However, I didn't do the paper piecing until the rest of the design was complete.  Cover the first couple with the paper mask, reposition the stencil and sponge through blue ink.  Repeat this step with pink ink for the third couple.

Add some definition round the edge with a blending tool and purple ink.

Using the other side of the same designer paper, I paper pieced the first couple.  Simply mounted onto white card to finish. 


I hope you like them.  Thanks for visiting.  See you again soon.  Till next time.  Xxx

Saturday 11 February 2017

Colourful dancers

Hello there.  Woke up this morning to a light dusting of snow, but its raining now and the skies are grey.  So what better than a colourful piece of art to brighten the day?

So here goes with another of my DT samples using the lovely new Claritystamp dancer stencils.  If I had to choose, then I think this one is  my favourite.

Difficult to see in the photo, but I started by embossing the stencil onto a sheet of watercolour paper.


Using this faint outline as a guide, I painted the dancers with masking fluid.


Once the masking fluid was dry, I started to layer up washes made with diluted acylic paint.  I used this rather than distress inks because I wanted the colours to remain true rather than blending together.


I left each layer to dry naturally before adding the next.  I even added some rock salt to some layers while the paint was still wet for extra texture.


I love how you can get blends where the colours overlap even though the actual paints haven't mixed together.  I then sponged some archival inks through the words stencil in the same colours.


A few little stars and splattered on some extra paint too.  Rubbed off the masking fluid to reveal the dancers still white beneath.


Just added some definition with a couple of grey pencils and simply mounted onto a white card.


Hope you like it.  Till next time.  Xxx

Monday 6 February 2017

Bursting with colour

Hello there!  We are already in February, and I really want to try and blog more often this year.  It's not always easy to find the time, but I do love coming on here to show you my latest projects and chat about what I love doing most:  making art.

Here is the first of my samples from Barbara Gray's Claritystamp show on Hochanda yesterday afternoon.  I absolutely love these stencils, and had so much fun using them.  

Today I'm going to share a technique I love to do using Colour Bursts.  This is the first time I've tried it out on black card though, and I'm happy to report it worked.

I used the coated black Clarity card and sponged Paperartsy Fresco Finish acrylic in snowflake through the stencil.  You can see below that it's better to go gently and build up the coverage in layers.


This gives a nice crisp design;  just what we want.


Make sure the paint's dry;  it only takes a couple of minutes, then replace the stencil and pull through clear embossing paste.  While it's still wet, sprinkle on the Colour Bursts;  the moisture in the paste will activate them.  I also added a little sprinkling of glitter, then left to dry.

And here you can see the finished design;  very simple and easy to achieve. 
I'll be back soon with another of my samples.  Till next time.  Xxx 

Wednesday 1 February 2017

Challenging myself to try something new

Well, it's 1st February and that means it's time for a new Clarity challenge;  and this month we're going all flower power.

I wanted to try out my new stash;  some Pebeo Vitrail and Fantasy paints.  I've never used them before, so I watched a couple of YouTube videos before going for it...

I started by cutting a 7" x 7" piece of board and mod podging on some kitchen foil.  This I hoped would reflect the light through the paints and allow them to glow.

Once dry, I dragged grunge paste through the poppy stencil, and set aside to dry.


I used Vitrail lightening medium with the colours to maintain their transluscency and stop them being too dark.  You can see here how I've poured on the Vitrail paint and mixed in some Fantasy Moon.  This contains loads of mica,  and manipulates into some fabulous patterns when it mixes with the Vitrail paint.  Set aside to dry again;  this does take a while with these paints, so you need to be patient.  I worked on this piece over several days;  doing a layer each day. 


To add more definition to the design, I brushed on black acrylic paint making sure to get plenty in the crevices before wiping off the excess with a baby wipe.  Repeat as many times as needed to build up the required depth of shadow.


Now I poured over another layer.


And dry brushed on some gold acrylic to subtly highlight the poppy design.


Now I wanted to add something to ground the poppies.  And you know when you don't listen to that little voice that says maybe you should leave well alone?

Definitely overcooked!  What can I do now?

To start with, I scraped a tiny bit of red ceramic paint onto the poppies to further highlight and define them.


Then some gilding flakes.


There's nothing else for it, but to go for another layer of paint.  Some Fantasy Moon this time to provide some coverage, and some glitter medium to highlight the flowers and stems.

Oooooh,  I think I might have just brought this back from the brink of disaster.


Touch up again with a little ceramic paint and the gilding flakes.  Use double sided adhesive sheets to stick to the mounting board...


And here it is finished in a plain Ribba frame from Ikea. 


Not perfect, but I feel proud of what I achieved for my first play with these products.  I'll definitely be trying them out again.

Looking forward to seeing your take on this month's theme.  Good luck!

Till next time.  Xxx