Friday 24 July 2015

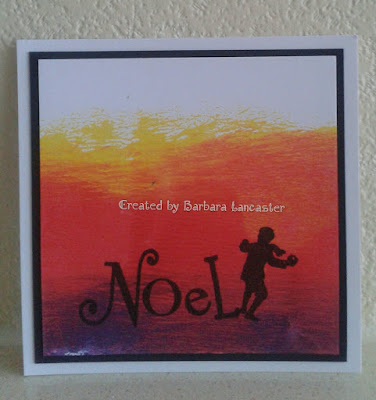
More than words...

Hello again.  Here's another of my samples from the last show.  This one very nearly didn't make the cut, as I was worried that the colours had gone too muddy around the edge.  That goes to show how much I know.  Everyone seems to love it.
 
 
I started out by stamping the words in black archival.  Then I stamped on the stars in versamark and embossed with clear detail powder.  Then I sloshed on some Spectrum Noir aquatints and sprinkled on some rock salt while it was still wet.  At this point I was really regretting adding the blue, as I thought it had gone a bit muddy where it mixed with the red.  Oh well, too late now.  Desperate to try and make it work, once it was dry I brushed round some dusty concord distress ink to try and bring out more of the purple tones.  I even seem to remember brayering on a touch of eggplant Paperartsy paint!
 

The star was made from a separate piece of card in the same way, just using the yellow aquatint.  The little girl with the star was stamped with black archival.  

Both pieces were matted onto black, the star attached with 3d tape, and it was done.  

You can get some incredible patterns for backgrounds using rock salt with aquatints.  Its one of those fun, messy techniques where you never know quite what the result will be.


Thanks for stopping by.  I'd love to hear what you think, so please take time to leave a comment.  I read and appreciate them all.  Till next time.  Xxx
 

Wednesday 15 July 2015

More Claritystamp Christmas Wee Folk

Hello everyone.  When these stamp sets arrived I just knew I was going to love working with them.  Of course, they mix and match perfectly with the word chains, which is what I did here.


The gift bag was steamed open, so I could lay it out flat and work on it, then stick it all back together again when I was done.

 
The bacgrounds were all made using Paperartsy Fresco Finish paints with the brayer:  I used Eggplant, London Bus and Banana.

 
The trick is not to overwork it;  you want the colours to mix and blend, not go muddy.

 
For the notelets, I now simply stamped in black archival and matted onto black card to finish.


For the bag, I also stamped the little stars from the wee folk fairy set all over the background, in a mixture of gold Spectrum Noir aquatint and second generation saffron, red geranium and deep purple archivals.  I then finished with the words and the wee folk to match the notelets.


Holes punched in the top of the gift bag to thread through some organza ribbon for a pretty bow, and its all finished.  I hope I've given you some inspiration to start your own Christmas projects and I'd love to hear what you think about this little set.  I really enjoyed making it.  Till next time.  Xxx

Thursday 9 July 2015

Claritystamp Christmas in July!

Hello everyone!  First I would like to thank you for all your kind words and messages following the Clarity show on Sunday.  I still have to keep pinching myself;  being asked to join the Clarity design team was a dream come true, and incredibly exciting.
 
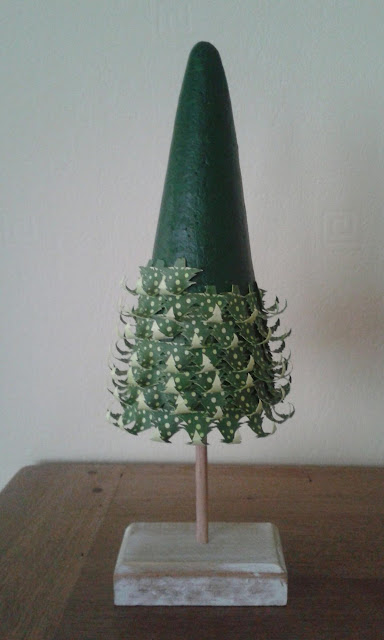
I thought I would blog my Christmas tree first, as that's made such an impression.  I've had a couple of requests to ask how its done:  there's nothing difficult, but you will need plenty of time and patience.

The base is a polystyrene cone painted with green acrylic paint.
 
 
Then it was just a matter of stamping out loads, and I do mean LOADS, (at least 150, possibly nearer 200) of Christmas trees and fussy cutting them, shaping and sticking them one by one onto the base.
 
 
The star is from the Lucky set and is made using fusible fibre;  2 sandwiched together over a cocktail stick.  I turned the trees the other way round to make the very top of the tree, then some extra trimming and fiddling was needed to make sure the join couldn't be seen
 
 
And that's it! 
 
I'm sure you won't have been able to resist the fabulous Christmas wee folk, so I hope I've given you some inspiration for projects of your own.
 
I'll be back soon to blog another of my samples from the show.  Till next time.  Xxx

Wednesday 1 July 2015

Anything goes this month!

Well, where did June go?  At least summer has finally arrived this week.  Thanks to all of you who entered last months Claritystamp challenge on the theme of "Boys, boys, boys."  So many fabulous entries, its getting harder than ever to choose our top 5.  This month, we've decided to give you free rein;  absolutely anything goes, so the only constraint is your imagination.  And of course, your collection of Clarity stamps and stencils and new Groovi stuff too!
 
As this is wedding season, I decided to make a keepsake horseshoe.
 
 
I started off with an MDF blank, and dragged some grunge paste through the dotty wave stencil to add some texture. 


Once the grunge paste was dry, the whole thing was given a couple of coats of pewter paint. 


I then quickly coated it with white paint, and wiped off a lot of it, allowing it to remain mainly in the crevices to give an old, distressed look. 
 
 
A tiny amount of gold acrylic was then dry brushed over the surface to add subtle glimmering highlights.
 
 
I die-cut this fancy label, stamped the couple first with watering can archival, then offset slightly with versamark  and gold embossed.  This gives a very subtle shadow;  not too much, or you lose the definition of the figures (yes, I found out the hard way!)  I then gently brushed round the edges with blue distress ink. 
 
 
A very small amount of seedless preserves distress ink was also brushed round the edges.  This required a very light touch to avoid overdoing it.
 
The flowers were repeat stamped with watering can archival onto some paper that had been coloured using Oak House Studio Colour Chemistry sprays.  They were fussy cut, and 3 layers glued togethet in the centre for each flower  
 
 
The leafy sprigs were stamped onto gelli card, VERY carefully fussy cut, then dipped into my melt pot.


"Forever" from the word chains was stamped first in watering can archival, then offset in versamark and gold embossed to create a shadow.  This was then carefully cut out.


The doves were stamped in grey archival onto gelli card, and in versamark onto some clearly for art modelling film which was then carefully gold embossed.


I arranged all the components and stuck them into place with pinflair glue gel.

All that was needed to finish was some complementary  ribbon.


I hope you like it, and I'd really appreciate it if you took time to leave a comment so I know you've stopped by;  I love to read your feedback on my work.  Now its over to you;  I am so looking forward to seeing loads of amazing entries this month.  Its always so inspiring to see all your different ideas.  Go on, you can do it!
 
 
Till next time.  Xxx